Build a Jenkins CI/CD Pipeline with Docker, SonarQube, and Trivy
A beginner-friendly, end-to-end guide to installing Jenkins and building a secure CI/CD pipeline for a Docker Compose application.
This guide explains how to build a complete Jenkins CI/CD pipeline on one Ubuntu server. It uses the DevTalk repository as a practical example, but the same process works for most Docker Compose projects.
By the end, every push to GitHub can automatically:
- download the latest code;
- run the frontend and backend tests;
- inspect code quality with SonarQube;
- scan dependencies and files with Trivy;
- build Docker images; and
- deploy the application with Docker Compose.
You do not need to be a Jenkins expert. Each section explains what to do, why it is needed, and how to confirm that it works.
Step 1: Understand the final architecture
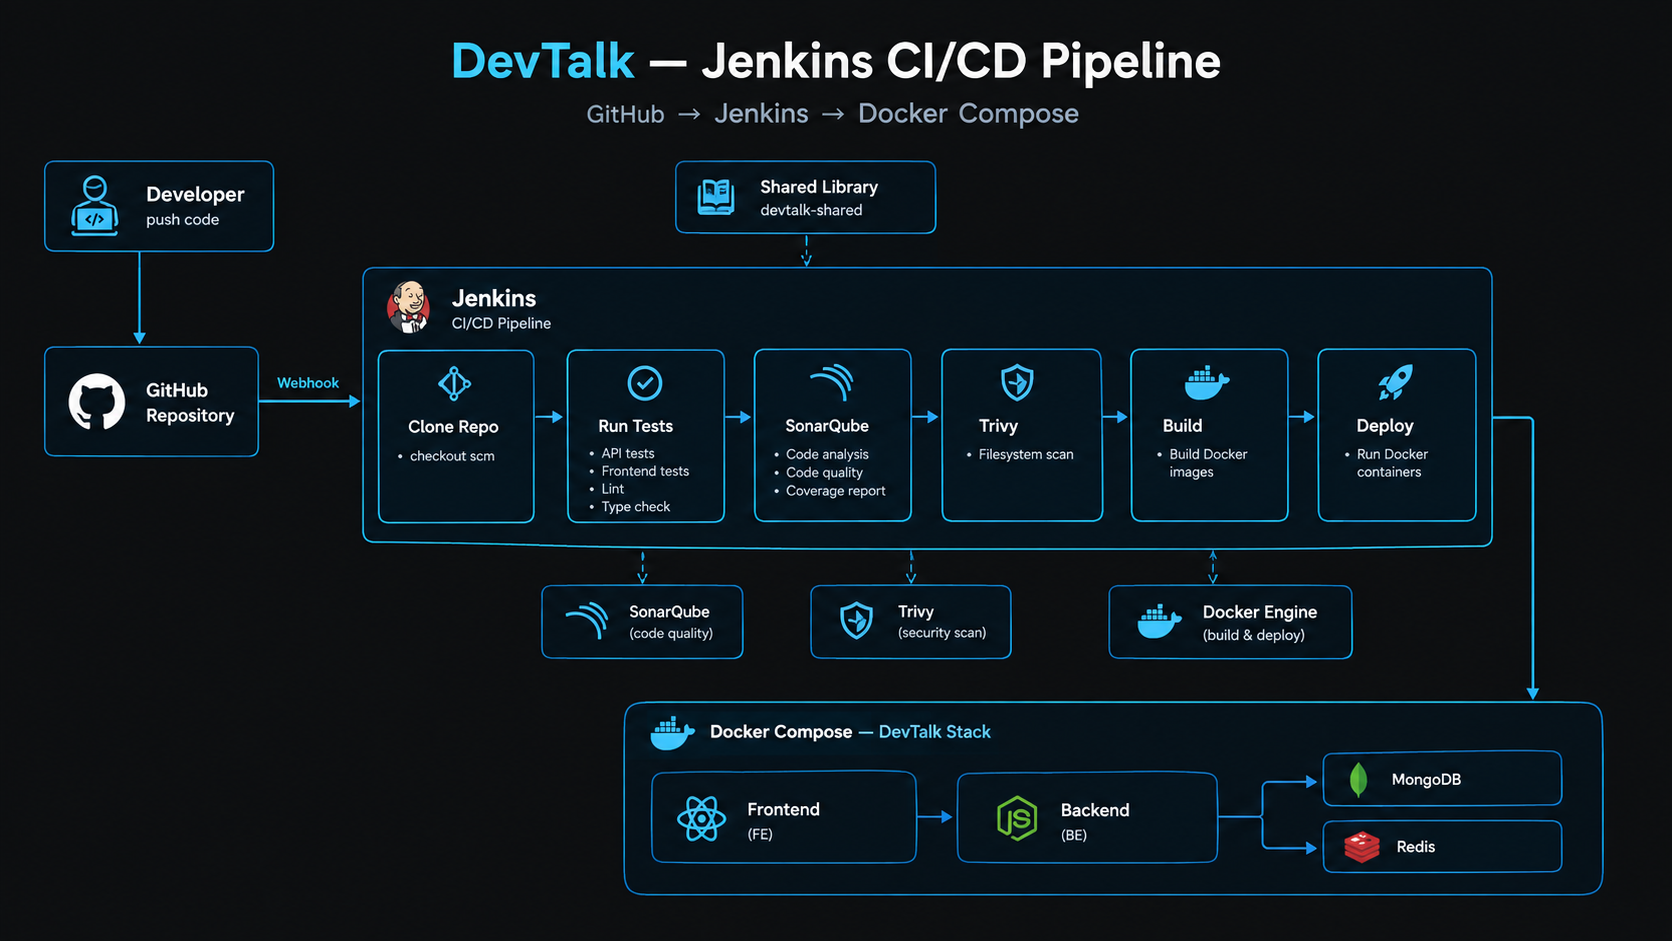
A developer pushes code to GitHub, and a webhook tells Jenkins to start the pipeline. Jenkins then completes each stage in order: clone, test, analyze, scan, build, and deploy. The final application runs as a Docker Compose stack containing the frontend, backend, MongoDB, and Redis.
The machine runs four things side by side:
| Process | Port on the host | Why that port |
|---|---|---|
| Jenkins | 8080 | Default Jenkins port. Leave it here. |
| DevTalk frontend | 3000 | Published by Compose. |
| DevTalk API | 8082 | The API container still listens on 8080 internally. The host publishes 8082 so it does not collide with Jenkins. |
| SonarQube | 9000 | Default SonarQube port. |
MongoDB and Redis are not published. The API reaches them on the Compose network as mongo and redis.
Step 2: Prepare the Ubuntu server
Use an Ubuntu server with at least 4 GB of RAM. An 8 GB server is safer when Jenkins, SonarQube, and the application run together. SonarQube uses more memory than the other services and may stop if the server runs out of RAM.
Allow these inbound TCP ports in the server firewall or cloud security group:
22for SSH;3000for the DevTalk frontend;8080for Jenkins;8082for the DevTalk API; and9000for SonarQube.
Only expose ports that you actually need. In production, place Jenkins and SonarQube behind HTTPS and restrict who can access them.
Step 3: Install Docker and Docker Compose
sudo apt update
sudo apt install -y docker.io docker-compose-v2
Confirm both commands work:
docker --version
docker compose version
Step 4: Install Jenkins
Jenkins requires Java. Install Java first, create the APT keyring directory, and then add the official Jenkins stable repository:
sudo apt-get install -y fontconfig openjdk-21-jre
sudo install -m 0755 -d /etc/apt/keyrings
sudo wget -O /etc/apt/keyrings/jenkins-keyring.asc \
  https://pkg.jenkins.io/debian-stable/jenkins.io-2026.key
echo "deb [signed-by=/etc/apt/keyrings/jenkins-keyring.asc]" \
  https://pkg.jenkins.io/debian-stable binary/ | sudo tee \
  /etc/apt/sources.list.d/jenkins.list > /dev/null
sudo apt update
sudo apt install -y jenkins
sudo systemctl enable --now jenkins
Jenkins runs as the jenkins user. That user must be allowed to run Docker:
sudo usermod -aG docker jenkins
sudo systemctl restart jenkins
Open http://YOUR_SERVER:8080. The unlock password is in:
sudo cat /var/lib/jenkins/secrets/initialAdminPasswordChoose Install suggested plugins, create the admin user, and keep the Jenkins URL as http://YOUR_SERVER:8080/.
Step 5: Install Trivy
Trivy scans the checked-out project for known vulnerabilities and insecure dependencies. The Jenkins scan stage calls trivy directly on the host, so install it on the same server:
sudo apt-get install -y wget gnupg
wget -qO - https://aquasecurity.github.io/trivy-repo/deb/public.key | gpg --dearmor | sudo tee /usr/share/keyrings/trivy.gpg > /dev/null
echo "deb [signed-by=/usr/share/keyrings/trivy.gpg] https://aquasecurity.github.io/trivy-repo/deb generic main" | sudo tee /etc/apt/sources.list.d/trivy.list
sudo apt-get update
sudo apt-get install -y trivy
Confirm the installation:
trivy --versionStep 6: Run the SonarQube server
SonarQube reviews source code for bugs, code smells, duplication, and maintainability issues. Its embedded Elasticsearch service needs a higher memory-map limit:
sudo sysctl -w vm.max_map_count=262144
echo "vm.max_map_count=262144" | sudo tee /etc/sysctl.d/99-sonarqube.conf

docker run -itd \
  --name sonarqube-server \
  --restart unless-stopped \
  -p 9000:9000 \
  sonarqube:lts-community
The image tag is
lts-community, notlst-community. The container name is also corrected tosonarqube-server.
Open http://YOUR_SERVER:9000, sign in with username admin and password admin, and change the default password when prompted. It may take a minute for the page to become available.
Check the container if SonarQube does not open:
docker ps --filter name=sonarqube-server
docker logs sonarqube-server
docker inspect -f 'OOMKilled={{.State.OOMKilled}} ExitCode={{.State.ExitCode}}' sonarqube-server
If OOMKilled=true appears, the server needs more memory. Restarting it will not solve the problem permanently if there is still not enough RAM.
Step 7: Install the required Jenkins plugins
Go to Manage Jenkins → Plugins → Available plugins and install:
| Plugin | Why this project uses it |
|---|---|
| Pipeline | Runs the Jenkinsfile. Included with suggested plugins. |
| Git | Checks out the GitHub repository. |
| GitHub | Receives push webhooks. |
| Credentials Binding | Injects JWT_SECRET into the build. |
| SonarQube Scanner | Provides tool 'Sonar' and withSonarQubeEnv. |
Restart Jenkins after the installs finish.
Step 8: Connect Jenkins to SonarQube
- In SonarQube, open My Account → Security and generate a token. Copy it once.
- In Jenkins, open Manage Jenkins → Credentials → System → Global credentials → Add Credentials.
- Kind: Secret text. Secret: the SonarQube token. ID:
sonarqube-token. - Open Manage Jenkins → System → SonarQube servers → Add SonarQube.
- Name:
Sonar. Server URL:http://YOUR_SERVER:9000. Server authentication token:sonarqube-token. - Open Manage Jenkins → Tools → SonarQube Scanner installations → Add SonarQube Scanner.
- Name:
Sonar. Check Install automatically and pick a recent scanner version.
The name Sonar has to match both places. vars/sonarScan.groovy calls tool 'Sonar' and withSonarQubeEnv('Sonar').
Step 9: Configure the Jenkins shared library
This repository keeps each pipeline step in vars/. Jenkins loads that folder as a Global Pipeline Library named devtalk-shared.
- Open Manage Jenkins → System → Global Pipeline Libraries → Add.
- Name:
devtalk-shared. - Default version:
main. - Retrieval method: Modern SCM.
- Source Code Management: Git.
- Repository URL:
https://github.com/Hasibul-Islam-Shanto/devtalk.git. - Credentials: add a GitHub username and personal access token if the repository is private. For a public repository you can leave credentials empty.
The library name must be exactly devtalk-shared, because the Jenkinsfile starts with @Library('devtalk-shared') _.
For your own project, pick any library name and use that same string in the Jenkinsfile. The vars/ folder must sit at the root of the repository the library points at.
Step 10: Add the application secret to Jenkins
The API refuses to start without JWT_SECRET. Store it in Jenkins, not in Git.
- Manage Jenkins → Credentials → System → Global credentials → Add Credentials.
- Kind: Secret text.
- Secret: a long random string.
- ID:
devtalk-jwt-secret.
buildApp and deployApp load that ID with withCredentials.
Step 11: Create the application environment file
Public URLs are baked into the frontend image at build time. Keep them in a file on the server so a GitHub push does not depend on typing them into Jenkins.
Create /var/lib/jenkins/devtalk.env as the jenkins user:
sudo tee /var/lib/jenkins/devtalk.env >/dev/null <<'EOF'
CLIENT_URL=http://YOUR_SERVER:3000
NEXT_PUBLIC_API_URL=http://YOUR_SERVER:8082
NEXT_PUBLIC_DEPLOY_URL=http://YOUR_SERVER:3000
COOKIE_SECURE=false
EOF
sudo chown jenkins:jenkins /var/lib/jenkins/devtalk.env
sudo chmod 600 /var/lib/jenkins/devtalk.env
Replace YOUR_SERVER with the public IP or domain users type in the browser. COOKIE_SECURE=false is required while the site is plain HTTP. Set it to true only behind HTTPS.
| Variable | Who uses it |
|---|---|
CLIENT_URL |
The API allows Socket.IO only from this origin. It must match the address in the browser, including the port. |
NEXT_PUBLIC_API_URL |
Compiled into the frontend. The browser opens Socket.IO and API calls against this URL. |
NEXT_PUBLIC_DEPLOY_URL |
Compiled into the frontend. Used when the browser calls the Next.js app itself. |
COOKIE_SECURE |
Marks auth cookies Secure. |
Do not commit this file. Do not put JWT_SECRET in it. Jenkins injects that from the credential.
Inside Compose, the Next.js server talks to the API at http://backend:8080. That address is only valid on the Docker network. The browser cannot use it, which is why NEXT_PUBLIC_API_URL is the public 8082 address.
Step 12: Create the Jenkins pipeline job
- From the Jenkins dashboard, click New Item.
- Name:
devtalk. Type: Pipeline. Click OK. - Description:
CI/CD pipeline for DevTalk. Checks out the repository, tests the API and the Next.js app, runs SonarQube and Trivy, then builds and deploys the Docker Compose stack.- Under Build Triggers, check GitHub hook trigger for GITScm polling.
- Under Pipeline, set Definition to Pipeline script from SCM.
- SCM: Git.
- Repository URL:
https://github.com/Hasibul-Islam-Shanto/devtalk.git. - Branch:
*/main. - Script Path:
Jenkinsfile. - Save.
If Definition is Pipeline script from SCM but SCM is left blank, Jenkins checks out NullSCM and fails immediately with Jenkinsfile not found. The Git section above is what fixes that.
Add the GitHub webhook
In the GitHub repository, open Settings → Webhooks → Add webhook.
- Payload URL:
http://YOUR_SERVER:8080/github-webhook/ - Content type:
application/json - Event: Just the push event
A push to main now starts the devtalk job.
Step 13: Understand the Jenkinsfile
Jenkinsfile is a declarative pipeline. It names the stages and calls one Groovy step each. The work lives in vars/, because a Global Pipeline Library turns each file into a step: vars/testApp.groovy becomes testApp().
@Library('devtalk-shared') _

pipeline {
    agent any

    stages {
        stage('Code clone from Github') {
            steps {
                script {
                    cloneRepo(scm)
                }
            }
        }
        stage('Test') { steps { testApp() } }
        stage('SonarQube Quality Analysis') { steps { sonarScan() } }
        stage('Trivy File System Scan') { steps { trivyScan() } }
        stage('Build') { steps { buildApp() } }
        stage('Deploy') {
            when {
                expression { return env.BRANCH_NAME == null || env.BRANCH_NAME == 'main' }
            }
            steps { deployApp() }
        }
    }
}
agent any runs on the built-in Jenkins node, which is this same machine, so Docker and Trivy are available.
cloneRepo(scm) receives the job’s Git configuration. Calling checkout scm from inside the shared library would check out the library repository instead of the job repository. Passing scm from the Jenkinsfile avoids that.
Deploy runs when BRANCH_NAME is empty (a single Pipeline job) or when the branch is main. A multibranch job can later skip deploy for feature branches without renaming the stage.
Step 14: Understand the shared-library steps
vars/cloneRepo.groovy
def call(scmSource) {
    checkout scmSource
}
def call is the function Jenkins runs when the step name is used. checkout downloads the commit GitHub just pushed into the job workspace.
vars/testApp.groovy
Tests run in Docker so the Jenkins machine does not need Node.js installed.
- The API workspace is mounted into
node:20-alpine. The container runsnpm ci, lint, andnpx vitest run --coverage.npm testalone starts Vitest in watch mode and would hang the job. - The frontend workspace is mounted into
node:22-alpine. The container runsnpm ci, lint,type-check, andtest:coverage. HUSKY=0skips Git hooks during install.- Coverage files are written back into the workspace because the folders are mounted. SonarQube reads them in the next stage.
vars/sonarScan.groovy
def call() {
    def scannerHome = tool 'Sonar'
    withSonarQubeEnv('Sonar') {
        sh "${scannerHome}/bin/sonar-scanner"
    }
}
tool 'Sonar' is the scanner installation from Manage Jenkins → Tools. withSonarQubeEnv('Sonar') injects the server URL and token. The scanner reads sonar-project.properties in the repository root, including the project key devTalk and the coverage report paths. The scan stage is after tests so those reports exist.
vars/trivyScan.groovy
def call() {
    sh 'trivy fs --exit-code 0 --format table -o trivy-fs-report.txt .'
    archiveArtifacts artifacts: 'trivy-fs-report.txt', allowEmptyArchive: true
}
Trivy scans the workspace for known vulnerabilities and archives trivy-fs-report.txt on the build page. --exit-code 0 records findings without failing the pipeline. Change 0 to 1 later if a vulnerability should block the deploy.
vars/buildApp.groovy and vars/deployApp.groovy
Both steps do the same preparation, then a different Compose command.
withCredentialsputsJWT_SECRETin the shell from the credentialdevtalk-jwt-secret.- The script loads
/var/lib/jenkins/devtalk.env. - It clears
CLIENT_URLand theNEXT_PUBLIC_variables first, so an old value left in the Jenkins process cannot override the file. - It checks that the three URLs are set.
- Build runs
docker compose build. Deploy runsdocker compose up -d --build.
docker compose up -d --build is enough on every deploy. Compose rebuilds images that changed and recreates containers whose settings changed. It leaves the MongoDB and Redis volumes in place. Do not run docker compose down -v from the pipeline. The -v flag deletes those volumes.
Step 15: Understand the Docker Compose deployment
docker-compose.yml at the repository root describes four services:
mongostores application data in themongo_datavolume.redishas no password in this setup. The API connects toredis://redis:6379.backendis built fromdevTalk-be/Dockerfile. Host port8082maps to container port8080.frontendis built fromdevTalk-fe/Dockerfile.NEXT_PUBLIC_API_URLandNEXT_PUBLIC_DEPLOY_URLare build arguments, so changing them requires a new image build. Restarting the old container is not enough.
The frontend container calls the API at http://backend:8080 for server-side requests. The browser uses the public URL from NEXT_PUBLIC_API_URL. Socket.IO connects to that same public URL, and the API accepts the connection only when the page origin equals CLIENT_URL.
If the socket stays disconnected after a deploy, check two things. The security group must allow port 8082. The values in devtalk.env must be the public address, then the job must run again so the frontend image is rebuilt.
Step 16: Run and verify the pipeline
Push the Jenkinsfile and the vars/ directory to main. In Jenkins, open the devtalk job and click Build Now.
A healthy run shows six stages in order: clone, test, SonarQube, Trivy, build, deploy. Afterward:
- App:
http://YOUR_SERVER:3000 - API health:
http://YOUR_SERVER:8082/health - SonarQube project:
http://YOUR_SERVER:9000under the keydevTalk - Trivy report: the build page, under Build Artifacts
If a stage fails, open that stage in Jenkins and read its console output. Fix the first clear error, then run the job again. Later errors are often side effects of the first failure.
Step 17: Adapt the pipeline for another project
- Install Jenkins, Docker, and Trivy the same way.
- Point the Global Pipeline Library at your repository and match the
@Libraryname. - Add a
Jenkinsfilethat only lists stages, and put each stage body invars/yourStep.groovywith adef call(). - Change
testAppto the images and commands your app needs. - Point
sonar-project.propertiesat your source folders. - Replace
docker-compose.ymlwith your services. Keep secrets in Jenkins credentials and public URLs in a file under/var/lib/jenkins/. - Create a Pipeline job with Pipeline script from SCM, Script Path
Jenkinsfile, and a GitHub push webhook.
Start with clone, test, and one Docker build. Add SonarQube, Trivy, and deployment only after the basic pipeline is working. Building it in small steps makes failures much easier to understand.
Final result
You now have a practical CI/CD workflow: GitHub starts Jenkins, Jenkins tests and scans the code, Docker Compose builds the services, and the main branch deploys automatically.
This setup is suitable for learning and portfolio projects. Before using it in production, add HTTPS, restrict access to Jenkins and SonarQube, back up persistent data, pin container image versions, and use a proper secret-management system.